Google’s OAuth 2.0 APIs can be used for open authentication. By this we can access user’s data from server after authorizing user via Google account.
In this tutorial, we are going to explain how you can implement Google open authentication to connect with your website using CodeIgniter.
You can achieve this login mechanism using Google API php client.
To start with this, first the Google API php client and save it in your CodeIgniter’s libraries folder, which you will find inside ci_google_oauth > application > libraries. Here ci_google_oauth is the base folder of program file.
You can also refer our live demo or download the Script file. Extract the downloaded files, save it in your local server and run it using path :
http://localhost/ci_google_oauth/Create Google OAuth Credentials
Before using the Google PHP client library and Oauth 2.0, you must register your application via Google Developers Console.
Google OAuth API required “Client ID” and “Client secret” and “Redirect URIS“ for your application.
Google OAuth API required “Client ID” and “Client secret” and “Redirect URIS“ for your application.
For this follow up the below given steps :
Step 1 : Go to https://developers.google.com/console and sign in by an existing Google account’s username or password.
When you logged in below screen will appear, for creating new project, click onCreate Project button .Now one popup window will appear, here write your project name and click onCreate button.
When you logged in below screen will appear, for creating new project, click onCreate Project button .Now one popup window will appear, here write your project name and click onCreate button.

Step 2 : After clicking on Create button below screen will appear. Now go to APIs & auth link.

Step 3 : In this section click on APIs link and find Google+ API by default its off for using this API , make it on by clicking onto OFF button.

Step 4 :After Enabling Google+ API. You will see it under Enabled APIs list..

Step 5 : Now click on Credentials links, here two button will appear Create new Client ID and Create new Key. First click on Create new client ID.

Step 6 : After clicking on Create new app ID one popup window will appear. Here you can select your application type, select Web application and click on Configure consent screen.

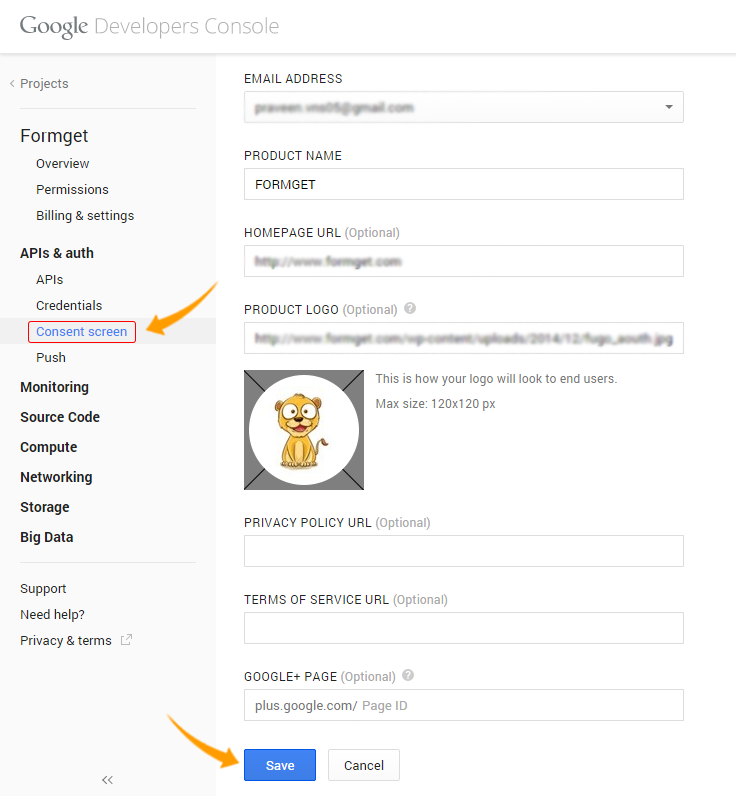
Step 7 : Next in Consent screen you can write your product name, homepage URL and product logo which will appear when API access Google data. Then click onSave button
Step 8 : In this window you can mention Authorized Javascript Origins andRedirect URIS.
Redirect URIS used when Google authenticate the user and you want to redirect the user in any URL. Now click on Create Client ID button.

Step 9: After submitting this form, we can get the client Id, secret key and etc as below.for API key click on Create new key button

Step 10:When you click on Create new key one popup window will appear, here you can generate API key for specific platform . We are using web application so click on Server key.

Step 11: In this window just click on Create button

Step 12: Now we finally got CLIENT ID, CLIENT SECRET, REDIRECT URIS and API KEY.

Copy these credentials and put them in your code, which is explained below.
Below is our complete code with short explanation :
Controllers : user_authentication.php
Copy the below code in your controller in that we are using two files , Client.phpand Oauth2.php from the library(google-api-php-client-master) that we have saved in libraries folder , other files are interconnected. Now write the Google OAuth Credentials (CLIENT ID, CLIENT SECRET, REDIRECT URIS and API KEY) in the below given space in the code.
<?php
// Start session

session_start();

class User_Authentication extends CI_Controller {

public function __construct() {
parent::__construct();
}

public function index() {

// Include two files from google-php-client library in controller
include_once APPPATH . "libraries/google-api-php-client-master/src/Google/Client.php";
include_once APPPATH . "libraries/google-api-php-client-master/src/Google/Service/Oauth2.php";

// Store values in variables from project created in Google Developer Console
$client_id = '< Generated Client Id >';
$client_secret = '< Generated Client secret Key >';
$redirect_uri = 'http://localhost/ci_google_oauth/';
$simple_api_key = '< Generated Server/API Key >';

// Create Client Request to access Google API
$client = new Google_Client();
$client->setApplicationName("PHP Google OAuth Login Example");
$client->setClientId($client_id);
$client->setClientSecret($client_secret);
$client->setRedirectUri($redirect_uri);
$client->setDeveloperKey($simple_api_key);
$client->addScope("https://www.googleapis.com/auth/userinfo.email");

// Send Client Request
$objOAuthService = new Google_Service_Oauth2($client);

// Add Access Token to Session
if (isset($_GET['code'])) {
$client->authenticate($_GET['code']);
$_SESSION['access_token'] = $client->getAccessToken();
header('Location: ' . filter_var($redirect_uri, FILTER_SANITIZE_URL));
}

// Set Access Token to make Request
if (isset($_SESSION['access_token']) && $_SESSION['access_token']) {
$client->setAccessToken($_SESSION['access_token']);
}

// Get User Data from Google and store them in $data
if ($client->getAccessToken()) {
$userData = $objOAuthService->userinfo->get();
$data['userData'] = $userData;
$_SESSION['access_token'] = $client->getAccessToken();
} else {
$authUrl = $client->createAuthUrl();
$data['authUrl'] = $authUrl;
}
// Load view and send values stored in $data
$this->load->view('google_authentication', $data);
}

// Unset session and logout
public function logout() {
unset($_SESSION['access_token']);
redirect(base_url());
}
}
?>
Views : google_authentication.php
Copy the below code in your view and save as google_authentication.php. This page contain Sign in with Google option. After sign in ,Google will redirect the user data to to google_authentication.php. Now you can see user information andlogout option.
<html>
<head>
<link rel="stylesheet" type="text/css" href="<?php echo base_url(); ?>css/style.css">
<link rel="stylesheet" media="screen and (max-width: 1200px) and (min-width: 0px)" type="text/css" href="<?php echo base_url(); ?>css/styleresponsive1.css">
<link rel="stylesheet" media="screen and (max-width: 600px) and (min-width: 0px)" type="text/css" href="<?php echo base_url(); ?>css/styleresponsive2.css">
<link href='http://fonts.googleapis.com/css?family=Source+Sans+Pro|Open+Sans+Condensed:300|Raleway' rel='stylesheet' type='text/css'>
</head>
<body>
<div id="main">
<div id="envelope">
<?php if (isset($authUrl)){ ?>
<header id="sign_in">
<h2>CodeIgniter Login With Google Oauth PHP</h2>
</header>
<hr>
<div id="content">
<center><a href="<?php echo $authUrl; ?>"><img id="google_signin" src="<?php echo base_url(); ?>images/google_login.jpg" width="100%" ></a></center>
</div>
<?php }else{ ?>
<header id="info">
<a target="_blank" class="user_name" href="<?php echo $userData->link; ?>" /><img class="user_img" src="<?php echo $userData->picture; ?>" width="15%" />
<?php echo '<p class="welcome"><i>Welcome ! </i>' . $userData->name . "</p>"; ?></a><a class='logout' href='https://www.google.com/accounts/Logout?continue=https://appengine.google.com/_ah/logout?continue=<?php echo base_url(); ?>index.php/user_authentication/logout'>Logout</a>
</header>
<?php
echo "<p class='profile'>Profile :-</p>";
echo "<p><b> First Name : </b>" . $userData->given_name . "</p>";
echo "<p><b> Last Name : </b>" . $userData->family_name . "</p>";
echo "<p><b> Gender : </b>" . $userData->gender . "</p>";
echo "<p><b>Email : </b>" . $userData->email . "</p>";
?>
<?php }?>
</div>
</div>
</body>
</html>
CSS : style.css
Styling HTML Elements.
body {
margin:0;
padding:0;
font-family:raleway;
background-image: url(../images/repeat-bg.png);
}
#main{
width: 65%;
height: 100%;
margin-left: 17%;
margin-top: 5%;
position: relative;
}
h2{
font-family:raleway;
}
div#envelope{
position: relative;
width: 51%;
border: 1px solid #CFCFD0;
border-radius: 10px;
background-color: #FFFFFF;
}
div#content{
width: 100%;
padding:12px auto;
overflow: hidden;
word-break: break-all;
overflow-wrap: break-word;
border-radius: 0 0 10px 10px;
}
header#sign_in{
font-family:raleway;
background-color: #079BAE;
text-align: center;
padding-top: 12px;
padding-left: 5px;
padding-bottom: 8px;
margin-bottom: -8px;
border-radius: 10px 10px 0 0;
color: white;
}
header#info{
font-family:raleway;
background-color: #079BAE;
margin-top: -11px;
padding-top:15px;
padding-bottom: 42px;
padding-left: 15px;
padding-right: 15px;
font-size: 16px;
border-radius: 10px 10px 0 0;
color: white;

}
header#info a.user_name{
font-family:raleway;
text-decoration: none;
color:white;
}
div.logout{
padding-top: 30px;
float:right;
}
a.logout{
font-family:raleway;
font-size: 20px;
font-weight: 600;
text-decoration: none;
padding-right: 0 auto;
float:right;
color:white;
}
p {
padding: 0 25px;
}
p.profile {
font-weight: bold;
font-size: 20px;
}
img.user_img{
border-radius:50% 50% 50% 50%;
border:3px solid white;
}
p.welcome{
margin-top: -50px;
margin-left: 12%;
}

No comments:
Post a Comment